Natural stone has always been a dream material for homeowners and designers. The texture, the depth, and the sense of permanence it brings to any space are hard to match. But for a long time, using real stone meant accepting heavy weights, high costs, and complicated installation. That is exactly the problem that stone veneer clay backing was designed to solve.
By fusing an ultra-thin slice of genuine natural stone onto a flexible polymer clay base, this material delivers everything you love about real stone without the structural demands of conventional cladding. It is lightweight, workable, and versatile enough to be used on curved surfaces, furniture, ceilings, and walls alike. In this guide, we cover the key benefits, a clear breakdown of the installation process, and an honest look at costs so you can decide whether this material is the right fit for your next project.
What Is Stone Veneer with Clay Backing?
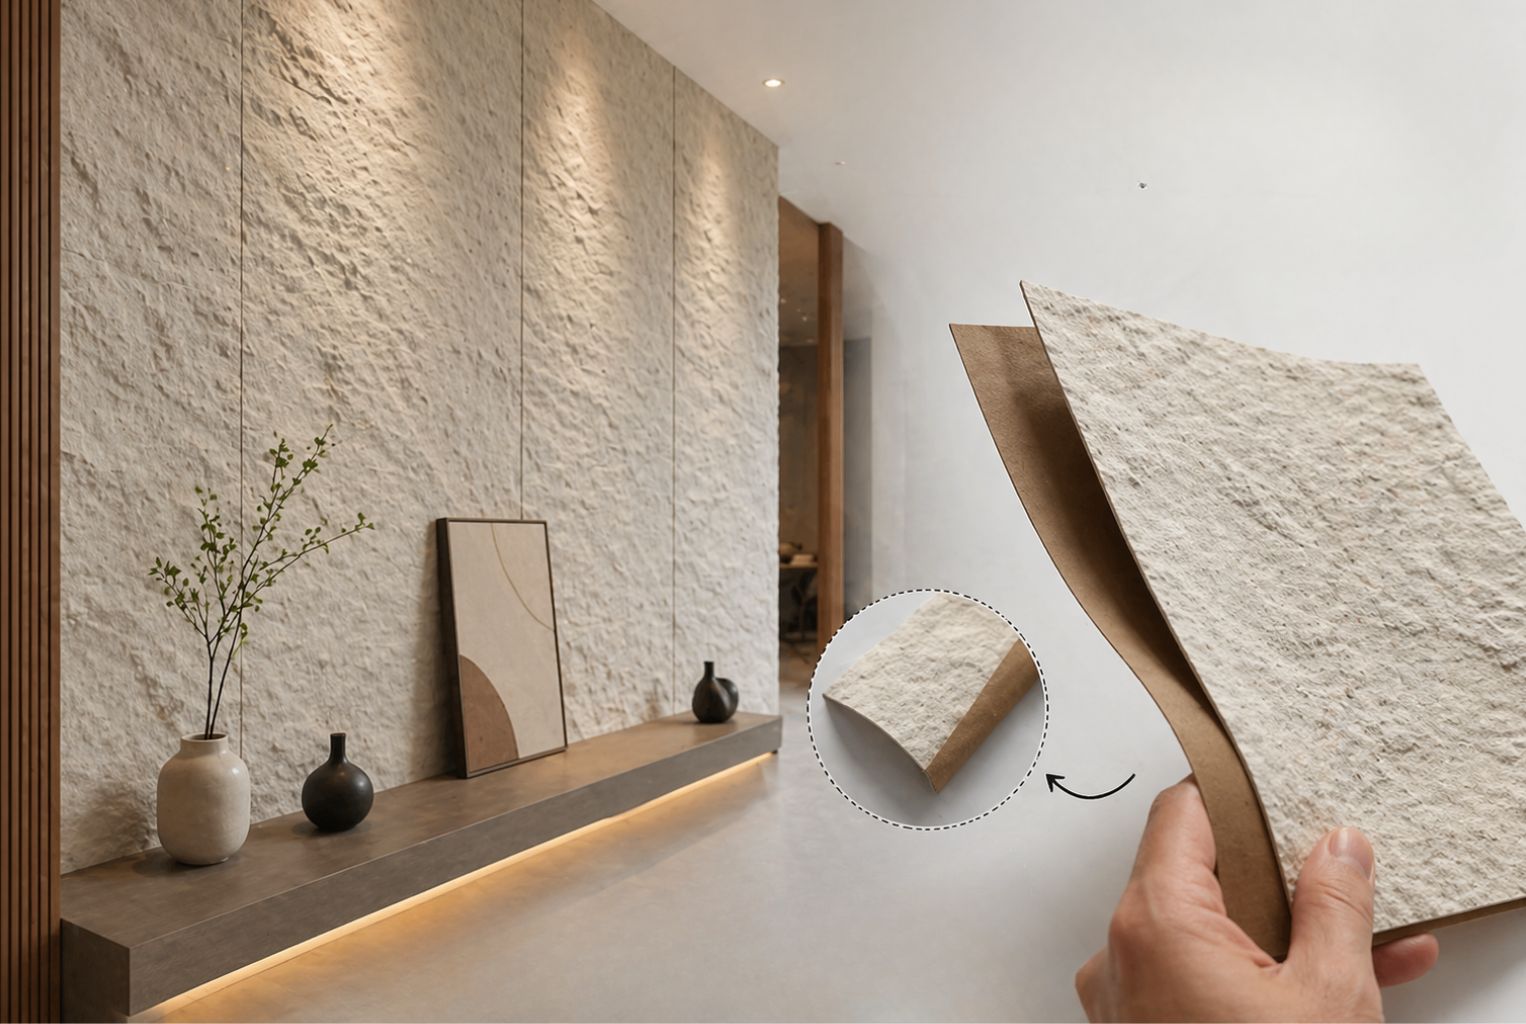
Before getting into the benefits and costs, it helps to understand exactly what this material is and how it is made. Natural stone is quarried in large blocks and then precision-cut into extremely thin slices, typically between 1mm and 3mm in thickness. These slices are then bonded to a flexible polymer clay backing using a specialist adhesive process that creates a composite panel that is both structurally stable and genuinely flexible.
The clay backing serves several important functions. It gives the thin stone slice a surface to adhere to, prevents it from cracking or breaking during handling, and allows the composite panel to flex slightly without damage. The result is a material that behaves much more like a sheet product than a stone tile, while retaining every characteristic of the original stone, including its color, grain, texture, and natural variation.
Stone types commonly available in this format include slate, limestone, quartzite, travertine, sandstone, and quartz. Each brings its own character to the finished surface, so the choice of stone type is as much a design decision as it is a practical one.
Key Clay Backing Stone Veneer Benefits
Understanding the clay-backed stone veneer benefits is the best place to start when evaluating whether this material suits your project. Here is a thorough look at what makes it stand apart from other cladding options.
Dramatically Reduced Weight
Traditional stone cladding can weigh anywhere from 20 to 80 kg per square meter, depending on the stone type and thickness. Stone veneer panels with clay backing weigh a fraction of that, often as little as 3 to 6 kg per square meter. This opens up applications that full stone cladding could never support, including walls that have not been structurally reinforced, furniture cladding, and ceiling installations.
Flexibility for Curved and Complex Surfaces
The polymer clay base allows the panel to flex gently around curves without cracking. This makes it possible to clad rounded columns, arched doorways, curved partition walls, and contoured furniture that would be impossible to finish with rigid stone tiles. Architects and interior designers particularly value this quality because it gives them genuine creative freedom.
Authentic Natural Appearance
Because the surface layer is genuine quarried stone, the appearance is completely authentic. The grain patterns, mineral deposits, color variations, and surface texture are exactly as nature formed them. This is not a printed imitation or a pressed polymer finish. It is the real stone, just in a far more practical format.
Suitability for Renovation Projects
Renovation projects often come with constraints that new builds do not. Existing walls may not support heavy cladding, timelines may be tight, and budgets may not stretch to full stone installation. Stone veneer with clay backing addresses all three. Its low weight means no structural reinforcement is needed; its ease of cutting and bonding means faster installation; and its overall cost per square metre is considerably lower than full stone.
Durability and Low Maintenance
When properly sealed, stone veneer panels are durable, stain-resistant, and easy to maintain. The sealed surface repels moisture and everyday dirt, meaning upkeep is limited to an occasional wipe with a damp cloth. Exterior installations benefit from periodic resealing every one to two years, depending on exposure levels, but beyond that, the material requires very little attention.
Stone Veneer Installation Process: Step by Step
The stone veneer installation process is one of the most frequently asked-about aspects of this material, particularly among those who are comparing it to conventional stone tiling. Here is a clear, practical breakdown of how installation typically works.
Step 1: Surface Assessment and Preparation
Start by examining the substrate where the veneer will be applied. The surface needs to be clean, dry, structurally sound, and reasonably flat. Minor imperfections are acceptable given the panel’s slight flexibility, but any crumbling, loose material, or active damp should be addressed before installation begins. Compatible substrates include concrete, plywood, MDF, drywall, and most existing tile surfaces.
Step 2: Planning the Layout
Before applying any adhesive, dry-fit the panels to plan the layout. This step is important for matching grain directions, managing the natural color variation between panels, and planning cuts around outlets, corners, and edges. A well-planned layout reduces waste and produces a more cohesive finished result.
Step 3: Cutting the Panels to Size
One of the practical advantages of this format is how easily the panels can be cut. A sharp utility knife handles most straight cuts with ease. For more complex shapes or curved edges, a jigsaw with a fine blade works well. No specialist stone-cutting equipment is required, which keeps both the time and cost of installation lower.
Step 4: Applying Adhesive and Bonding the Panels
Apply a suitable flexible polymer adhesive to the back of the panel or directly to the substrate using a notched trowel for even coverage. Press the panel firmly into position and hold it for a few seconds to establish initial bond contact. Work panel by panel, checking alignment as you go. For wall applications, starting from the bottom and working upward helps maintain straight lines throughout.
Step 5: Finishing and Sealing
Once all panels are bonded and the adhesive has fully cured, apply a quality stone sealant across the entire surface. The sealant penetrates the stone, protects against moisture and staining, and gives the surface a finished appearance. Choose between matte, satin, or gloss finishes depending on the design brief. Allow the sealant to cure fully before the surface is put into regular use.
Where Thin Stone Veneer with Clay Backing Works Best
The range of applications for thin stone veneer clay backing panels is genuinely broad. Here are some of the most popular and effective uses across both residential and commercial projects:
- Living room feature walls: A full-height stone veneer wall behind a sofa or media unit creates an instant focal point that feels luxurious without dominating the room.
- Bathroom cladding: Stone veneer gives bathrooms a spa-like quality that painted tiles and wallpaper simply cannot match. Proper sealing makes it fully suitable for wet areas.
- Kitchen backsplashes: The sealed stone surface is easy to wipe clean, and the natural texture adds warmth and character to kitchen spaces that often feel overly clinical.
- Exterior facade cladding: Lightweight panels are far easier to install on building exteriors than full stone, and they perform well in outdoor environments when correctly sealed.
- Commercial interiors: Hotels, restaurants, retail boutiques, and co-working spaces regularly use stone veneer to create premium brand environments that communicate quality without the cost of full stone installation.
- Furniture cladding: Tabletops, headboards, reception desks, and display counters can all be clad in stone veneer to create bespoke furniture pieces that are genuinely distinctive.
Cost Guide: What to Budget for Stone Veneer with Clay Backing
Cost is always a practical consideration, and stone veneer is generally more accessible than full stone cladding while still delivering a premium result. Here is a realistic breakdown of the costs involved.
Material Costs
The price of stone veneer panels varies depending on the stone type, the supplier, the size of the panels, and the finish. As a general guide, expect to pay anywhere from Rs. 150 to Rs. 600 or more per square metre for the panels themselves. Rarer stone types and larger format panels tend to sit at the higher end of that range.
Adhesive and Sealant Costs
A quality polymer-compatible adhesive typically costs between Rs. 300 and Rs. 600 per kg, with coverage depending on the porosity of the substrate and the method of application. Stone sealant adds a further Rs. 100 to Rs. 300 per square metre, depending on the product used and the number of coats applied.
Labour Costs
Labor costs vary by city and by the complexity of the installation. Simple flat wall installations are at the lower end, while curved surfaces, intricate cuts, or high-ceiling applications will cost more. As a rough guide, expect to pay between Rs. 80 and Rs. 200 per square meter for installation labor, not including any preparatory work on the substrate.
Comparison with Full Stone Cladding
Full natural stone cladding in India can cost several times more per square metre when you account for material, specialist cutting, structural considerations, and extended labor time. Stone veneer with clay backing delivers a visually equivalent result at a significantly lower total project cost, which is one of the main reasons it has become such a widely specified material in both residential and commercial projects.
What to Check Before You Buy
Not all thin stone veneer clay backing products are made to the same standard. Here are the key things to check when evaluating a supplier or a specific product:
- Stone authenticity: Confirm that the surface layer is genuine quarried stone rather than a printed or engineered imitation.
- Backing quality: The polymer clay base should be uniform, stable, and firmly bonded to the stone layer with no visible separation or delamination.
- Panel flexibility: A good product will flex noticeably without cracking the stone surface. Ask for a sample and test it yourself before committing to a large order.
- Thickness consistency: Panels should be consistent in thickness across the sheet. Variation in thickness causes problems during installation and affects the finish.
- Supplier reputation: Work with suppliers who can provide references, offer technical support, and supply samples so you can assess quality before purchase.
Conclusion:
When you consider the full picture, stone veneer clay backing panels represent one of the most intelligent material choices available for modern interiors and exteriors. They deliver the beauty and authenticity of real natural stone, combined with the practicality of a lightweight, flexible sheet format that can be installed quickly and applied almost anywhere.
The benefits are real and measurable, the installation process is straightforward compared to conventional stone cladding, and the cost is considerably lower than full stone alternatives without any compromise on the final visual result. Whether you are planning a single feature wall or a complete interior transformation, stone veneer with clay backing is a material worth serious consideration.
For those looking to source high-quality stone veneer panels with reliable clay backing, Earth Stone Global offers a carefully curated range of natural stone veneer products that combine authentic stone quality with the engineering precision that demanding projects require.
Frequently Asked Questions
- What is the clay backing made of?
A flexible polymer clay compound that supports the thin stone layer. It allows bending without cracking. - Can it be used outdoors?
Yes, when properly sealed, it withstands weather conditions. Resealing every 1–2 years is recommended. - How long does installation take?
Around 1–2 days for a standard 10–15 sq. meter wall. It is quicker than traditional stone installation. - Why choose it over porcelain tiles?
It offers real stone texture and natural variation. Also flexible, unlike rigid porcelain tiles. - Is it DIY-friendly?
Yes, for small and simple areas. For best results, professional installation is recommended. - Is stone veneer with clay backing lightweight?
Yes, it is much lighter than traditional stone. This makes handling and installation easier. - Does it require maintenance?
Minimal maintenance is needed for indoor use. Occasional cleaning and sealing keep it in good condition.